
DIGITAL INFRARED PHOTOGRAPHY TUTORIALS now with more WOW!
(WANT EVEN MORE INFRARED TUTORIALS? Click here)
Use this one to find out how to use Channel Mixer to achieve surreal color casts in your digital infrared photos
STEP 1: open your image,
STEP 2: go to Image>adjust>auto levels. To get this

STEP 3: now go to Image>adjust>channel mixer and make sure the Output Channel drop down box says “Red.”
In the Source channels slider below this, change the 100 to 0, for the Red channel (top slider), and change the Blue slider from 0 to 100.
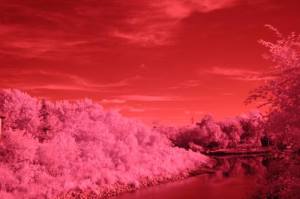
You will get something that looks like this.
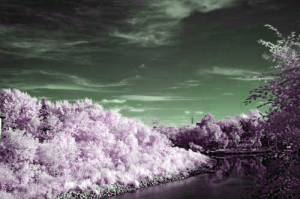
STEP 4: next, go to the Source channels drop down, and select the Blue channel. Make the Red channel 100 (from 0) and the Blue channel 0 form 100. Your image will look a bit like this.
The last step is to go to Image>Adjust> Hue and Saturation and bump down the magenta saturation until your foliage looks whitish. Then you can also bump down the Master saturation to avoid a really obviously manipulated image.
I find this technique works best when you have a clear sky with some cloud – for interest; AND when the you are shooting AWAY from the sun, maximizing the amount of IR reflection.
If you like this tutorial, you might like too see the complete collection of Infrared tutorials I have put together – over 102 pages of unique IR tutorials and recipes!
Or here’s an even easier way, use Photoshop Actions to automate everything.
I’ve created a custom set of Photoshop Actions to help you achieve a perfect digital infrared photo every time!
Click the banner below to go to the Action demo page. These are the very same steps I used to create my award winning infrared images.
Looking for MORE Infrared Tutorials and Techniques? Get my newest Infrared Tutorials – a complete program to give you all the tools you need to create fantastic IR images – the Actions (below) are included, for free!
RELATED:
Complete Guide to Digital Infrared Photography
The Art of Infrared Photography
Infrared Photography Handbook